State Size Reduction
Options for reducing disk usage on non-archival nodes through offline pruning or fresh state sync.
For nodes that don't need archival state, disk usage grows over time as state sync snapshots accumulate. Here are two options to reclaim disk space.
Option 1: Offline Pruning (State Sync Snapshot Deletion)
Removes accumulated state sync snapshots while keeping your database intact.
| Pros | Cons |
|---|---|
| Only need a single node | Need to stop the node |
| Preserves transaction index | Downtime required (duration varies) |
| No network bandwidth required | Requires temporary disk space for bloom filter |
The duration of offline pruning depends on how many state sync snapshots have accumulated since the last pruning. A node pruned regularly may complete quickly, while one never pruned could take significantly longer.
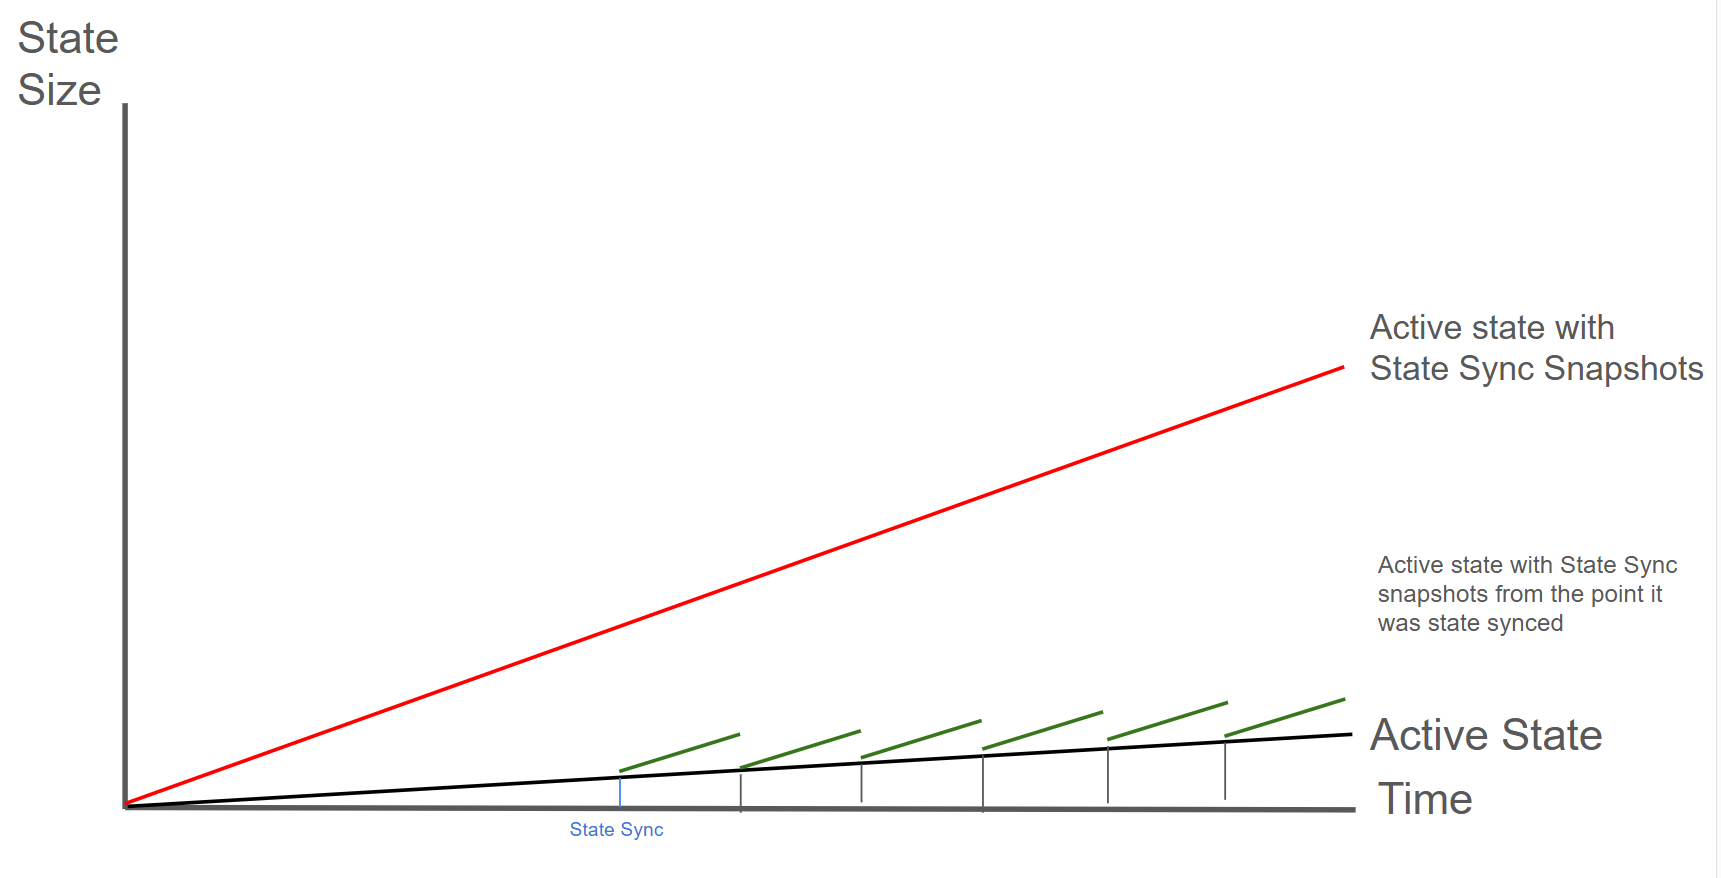
The green line shows a node performing periodic offline pruning. Each black vertical drop represents a pruning event: the node's state drops from "Active + Snapshots" back to just "Active State". Frequent pruning is recommended: it keeps disk usage low and each pruning operation completes faster since there are fewer snapshots to remove.
How Offline Pruning Works
Offline Pruning is ported from go-ethereum to reduce the amount of disk space taken up by the TrieDB (storage for the Merkle Forest).
Offline pruning creates a bloom filter and adds all trie nodes in the active state to the bloom filter to mark the data as protected. This ensures that any part of the active state will not be removed during offline pruning.
After generating the bloom filter, offline pruning iterates over the database and searches for trie nodes that are safe to be removed from disk.
A bloom filter is a probabilistic data structure that reports whether an item is definitely not in a set or possibly in a set. Therefore, for each key we iterate, we check if it is in the bloom filter. If the key is definitely not in the bloom filter, then it is not in the active state and we can safely delete it. If the key is possibly in the set, then we skip over it to ensure we do not delete any active state.
During iteration, the underlying database (LevelDB) writes deletion markers, causing a temporary increase in disk usage.
After iterating over the database and deleting any old trie nodes that it can, offline pruning then runs compaction to minimize the DB size after the potentially large number of delete operations.
Finding the C-Chain Config File
In order to enable offline pruning, you need to update the C-Chain config file to include the parameters offline-pruning-enabled and offline-pruning-data-directory.
The default location of the C-Chain config file is ~/.avalanchego/configs/chains/C/config.json. Please note that by default, this file does not exist. You would need to create it manually. You can update the directory for chain configs by passing in the directory of your choice via the CLI argument: chain-config-dir. See this for more info. For example, if you start your node with:
./build/avalanchego --chain-config-dir=/home/ubuntu/chain-configsThe chain config directory will be updated to /home/ubuntu/chain-configs and the corresponding C-Chain config file will be: /home/ubuntu/chain-configs/C/config.json.
Running Offline Pruning
In order to enable offline pruning, update the C-Chain config file to include the following parameters:
{
  "offline-pruning-enabled": true,
  "offline-pruning-data-directory": "/home/ubuntu/offline-pruning"
}
This will set /home/ubuntu/offline-pruning as the directory to be used by the offline pruner. Offline pruning will store the bloom filter in this location, so you must ensure that the path exists.
Now that the C-Chain config file has been updated, you can start your node with the command (no CLI arguments are necessary if using the default chain config directory):
Once AvalancheGo starts the C-Chain, you can expect to see update logs from the offline pruner:
INFO [02-09|00:20:15.625] Iterating state snapshot                 accounts=297,231 slots=6,669,708 elapsed=16.001s eta=1m29.03s
INFO [02-09|00:20:23.626] Iterating state snapshot                 accounts=401,907 slots=10,698,094 elapsed=24.001s eta=1m32.522s
INFO [02-09|00:20:31.626] Iterating state snapshot                 accounts=606,544 slots=13,891,948 elapsed=32.002s eta=1m10.927s
...
INFO [02-09|00:21:47.342] Iterated snapshot                        accounts=1,950,875 slots=49,667,870 elapsed=1m47.718s
INFO [02-09|00:21:47.351] Writing state bloom to disk              name=/home/ubuntu/offline-pruning/statebloom.0xd6fca36db4b60b34330377040ef6566f6033ed8464731cbb06dc35c8401fa38e.bf.gz
INFO [02-09|00:23:04.421] State bloom filter committed             name=/home/ubuntu/offline-pruning/statebloom.0xd6fca36db4b60b34330377040ef6566f6033ed8464731cbb06dc35c8401fa38e.bf.gz
The bloom filter should be populated and committed to disk after about 5 minutes. At this point, if the node shuts down, it will resume the offline pruning session when it restarts (note: this operation cannot be cancelled).
In order to ensure that users do not mistakenly leave offline pruning enabled for the long term (which could result in an hour of downtime on each restart), we have added a manual protection which requires that after an offline pruning session, the node must be started with offline pruning disabled at least once before it will start with offline pruning enabled again. Therefore, once the bloom filter has been committed to disk, you should update the C-Chain config file to include the following parameters:
{
  "offline-pruning-enabled": false,
  "offline-pruning-data-directory": "/home/ubuntu/offline-pruning"
}
It is important to keep the same data directory in the config file, so that the node knows where to look for the bloom filter on a restart if offline pruning has not finished.
Now if your node restarts, it will be marked as having correctly disabled offline pruning after the run and be allowed to resume normal operation once offline pruning has finished running.
You will see progress logs throughout the offline pruning run which will indicate the session's progress:
INFO [02-09|00:31:51.920] Pruning state data                       nodes=40,116,759 size=10.08GiB  elapsed=8m47.499s eta=12m50.961s
INFO [02-09|00:31:59.921] Pruning state data                       nodes=41,659,059 size=10.47GiB  elapsed=8m55.499s eta=12m13.822s
...
INFO [02-09|00:42:45.359] Pruned state data                        nodes=98,744,430 size=24.82GiB  elapsed=19m40.938s
INFO [02-09|00:42:45.360] Compacting database                      range=0x00-0x10 elapsed="2.157µs"
...
INFO [02-09|00:59:34.367] Database compaction finished             elapsed=16m49.006s
INFO [02-09|00:59:34.367] State pruning successful                 pruned=24.82GiB elapsed=39m34.749s
INFO [02-09|00:59:34.367] Completed offline pruning. Re-initializing blockchain.
At this point, the node will go into bootstrapping and (once bootstrapping completes) resume consensus and operate as normal.
Disk Space Considerations
To ensure the node does not enter an inconsistent state, the bloom filter used for pruning is persisted to offline-pruning-data-directory for the duration of the operation. This directory should have offline-pruning-bloom-filter-size available in disk space (default 512 MB).
The underlying database (LevelDB) uses deletion markers (tombstones) to identify newly deleted keys. These markers are temporarily persisted to disk until they are removed during a process known as compaction. This will lead to an increase in disk usage during pruning. If your node runs out of disk space during pruning, you may safely restart the pruning operation. This may succeed as restarting the node triggers compaction.
If restarting the pruning operation does not succeed, additional disk space should be provisioned.
Option 2: Replace with Freshly State Synced Node
Bootstrap a new node via state sync and transfer your validator identity to achieve zero downtime.
| Pros | Cons |
|---|---|
| No downtime for validator | Needs separate machine to bootstrap |
| Fresh, clean database | Network bandwidth for sync |
| No bloom filter disk overhead | More complex multi-step process |
How It Works
This works because your validator identity is determined by cryptographic keys in the staking directory, not the database.
Your validator identity consists of three key files in ~/.avalanchego/staking/:
- staker.crt - TLS certificate (determines your Node ID)
- staker.key - TLS private key (for encrypted P2P communication)
- signer.key - BLS signing key (for consensus signatures)
These files define your validator identity. The Node ID shown on the P-Chain is cryptographically derived from staker.crt, so copying these files transfers your complete validator identity.

The diagram shows the process: stop the old node, let a new node state sync, then transfer the staking keys to continue validating with a fresh database.
Step-by-Step Process
-
Provision a new server with the same or better specs than your current validator
-
Install and configure AvalancheGo on the new server, but don't start it yet:
# Install AvalancheGo on new server # Follow: /docs/nodes/run-a-node/using-install-script/installing-avalanche-go -
Let the new node sync completely (start it normally to download the blockchain):
# On new server sudo systemctl start avalanchego # Monitor sync progress (wait until fully synced) # This may take several hours curl -X POST --data '{ "jsonrpc":"2.0", "id" :1, "method" :"info.isBootstrapped", "params": { "chain":"C" } }' -H 'content-type:application/json;' 127.0.0.1:9650/ext/info -
Stop both nodes simultaneously to prepare for the identity transfer:
# On old validator sudo systemctl stop avalanchego # On new server sudo systemctl stop avalanchego -
Backup the new server's auto-generated keys (optional but recommended):
# On new server mv ~/.avalanchego/staking ~/.avalanchego/staking.backup -
Copy the staking directory from your old validator to the new server:
# From your old validator, copy to new server scp -r ~/.avalanchego/staking/ user@new-server:~/.avalanchego/ # Or use rsync for better control: rsync -avz ~/.avalanchego/staking/ user@new-server:~/.avalanchego/staking/ -
Verify file permissions on the new server:
# On new server chmod 700 ~/.avalanchego/staking chmod 400 ~/.avalanchego/staking/staker.key chmod 400 ~/.avalanchego/staking/staker.crt chmod 400 ~/.avalanchego/staking/signer.key chown -R avalanche:avalanche ~/.avalanchego/staking # If using avalanche user -
Start the new node with your validator identity:
# On new server sudo systemctl start avalanchego -
Verify the Node ID matches:
# On new server - confirm this matches your registered validator Node ID curl -X POST --data '{ "jsonrpc":"2.0", "id" :1, "method" :"info.getNodeID" }' -H 'content-type:application/json;' 127.0.0.1:9650/ext/info -
Monitor for successful validation:
# Check if you're validating
curl -X POST --data '{
  "jsonrpc":"2.0",
  "id"     :1,
  "method" :"platform.getCurrentValidators",
  "params": {
    "subnetID": null
  }
}' -H 'content-type:application/json;' 127.0.0.1:9650/ext/P
Important Notes
-
Timing: The entire stop → transfer → start process typically takes 5-15 minutes. Your validator will miss some blocks during this window, but won't be penalized as long as you're back online before your uptime drops below 80%.
-
Don't run both nodes simultaneously: Running two nodes with the same staking keys simultaneously can cause network issues and potential penalties. Always stop the old node before starting the new one.
-
Database not needed: You don't need to copy
~/.avalanchego/db/- the new node already has a fresh, synced database from step 3. -
Config files: If you have custom configuration in
~/.avalanchego/configs/, copy those as well to maintain the same node behavior.
Alternative: Update node in place
If your server supports it, you can also achieve zero downtime by:
- Attaching additional storage to your existing server
- Syncing a new database to the new disk in a separate directory
- Stopping AvalancheGo briefly
- Updating the data directory config to point to the new disk
- Starting AvalancheGo with the fresh database
This avoids transferring staking keys but requires more complex storage management.
Comparison: Which Option to Choose?
| Consideration | Offline Pruning | Fresh State Sync |
|---|---|---|
| Downtime | Required (duration varies) | None (if done correctly) |
| Hardware needed | Single node | Two machines temporarily |
| Complexity | Simple config change | Multi-step process |
| Disk during process | +512MB bloom filter | Second full node |
| Best for | Single validators, scheduled maintenance | Critical uptime requirements |
Monitoring Disk Usage
Track your node's disk usage over time to plan maintenance:
# Check database size
du -sh ~/.avalanchego/db

# Check available disk space
df -h /
Consider setting up alerts when disk usage exceeds 80% to give yourself time to plan maintenance.
Is this guide helpful?