Chain State Management
Understanding active state vs archive state in EVM chains, and how to manage disk usage through state sync and offline pruning.
When running an EVM-based blockchain (C-Chain or Subnet-EVM L1s), your node stores blockchain state on disk. Understanding the difference between active state, pruned state, and archive state is crucial for managing disk space and choosing the right sync method.
State Types Comparison
Your node's storage requirements depend on which type of state you're maintaining:
| Property | Active State | Pruned State | Archive State (Total State) |
|---|---|---|---|
| Size (C-Chain) | ~500 GB | ~750 GB - 1 TB | ~3 TB+ (and growing) |
| Contents | Current account balances, contract storage, code | Current state + recent historical trie nodes | Complete state history at every block |
| Required for | Validating, sending transactions, reading current state | Same as Active State, with some recent history | Historical queries at any block height, block explorers, analytics |
| Sync method | State sync (fast) | State sync, then grows over time | Full sync from genesis (slower) |
| Maintenance | Regular pruning or resync needed | Regular pruning or resync needed | None needed (intentional full history) |
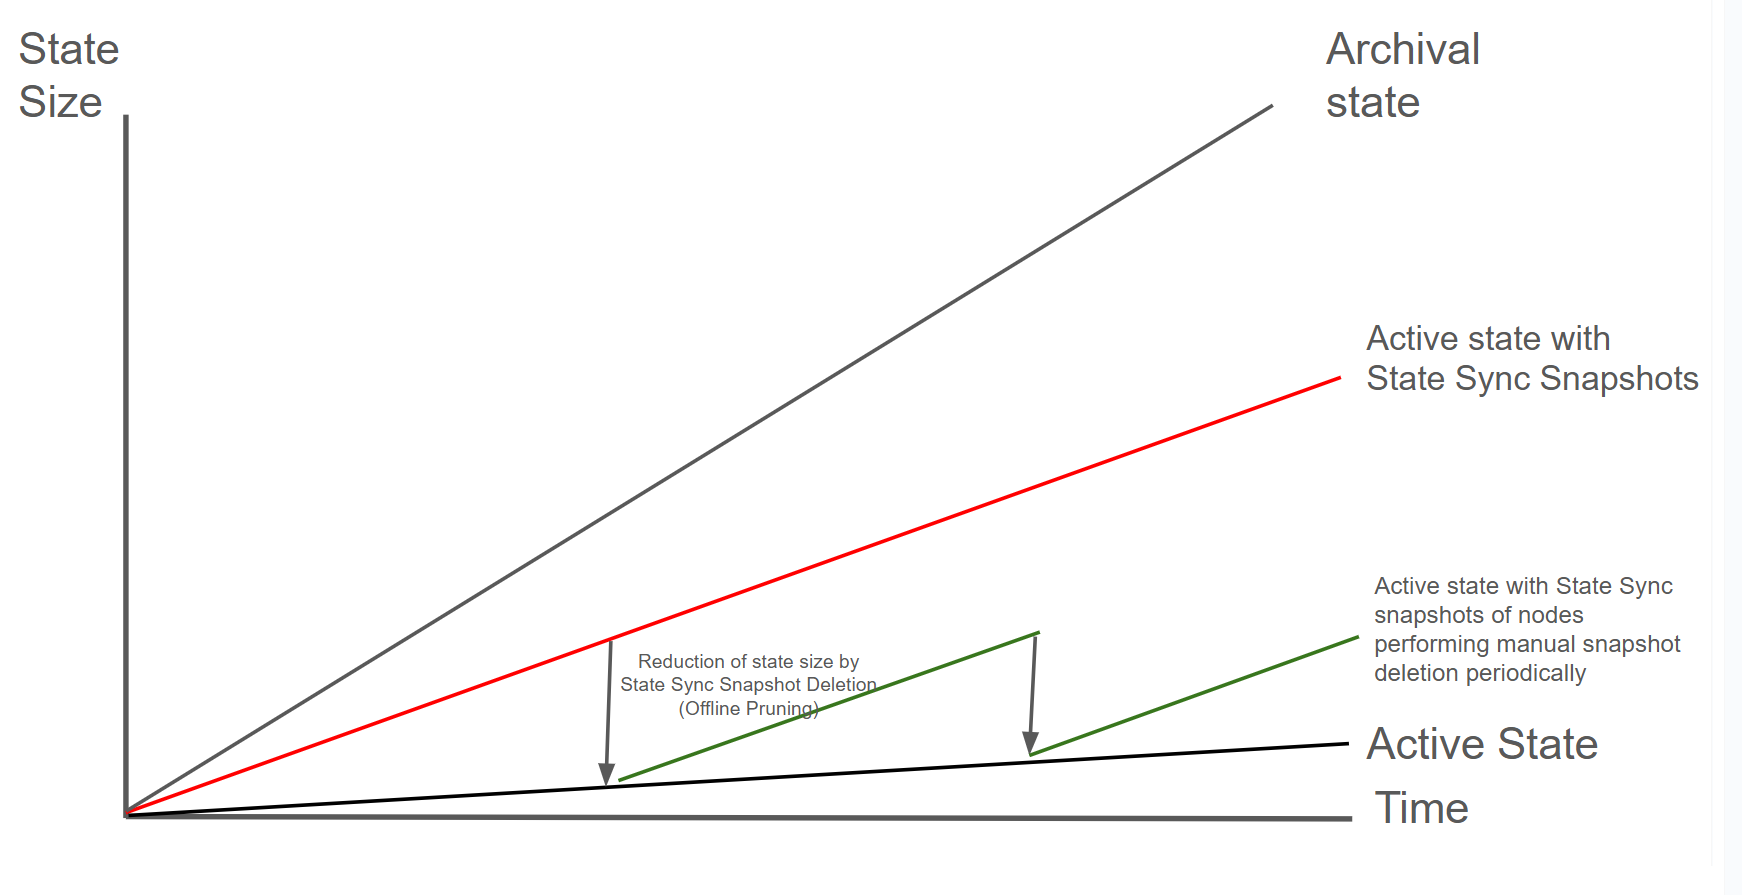
Active State
The active state represents the current state of the blockchain—all account balances, contract storage, and code as of the latest block. This is what your node needs to validate new transactions and participate in consensus. When you bootstrap with state sync, you start with just the active state.
Pruned State
Pruned state is what your node accumulates over time after starting with active state. As blocks are processed, old trie nodes aren't immediately deleted, causing disk usage to grow beyond the active state size. Running offline pruning periodically removes these old nodes while keeping your node functional. Most long-running validators operate in this state.
Archive State (Total State)
The archive state includes the complete history of all state changes since genesis. This allows querying historical state at any block height (e.g., "What was this account's balance at block 1,000,000?"). Archive nodes are typically only required for block explorers, indexers, and specialized analytics applications.
Most validators and RPC nodes only need active state or can operate with pruned state. Archive nodes are specialized infrastructure for historical data access.
Why State Grows Over Time
Even if you start with just the active state, your node's disk usage will grow over time:
- New blocks: Each block adds new state changes
- State trie overhead: The Merkle Patricia Trie structure stores intermediate nodes
- Deleted state retention: Old trie nodes aren't automatically removed
This means a node that started with 500 GB via state sync might grow to 1 TB+ over months of operation, even though the "current" active state is still ~500 GB.
State Growth Visualization
Understanding the Chart:
-
Total State (solid red line): Grows faster over time as historical state data accumulates
- Includes both current state and all historical intermediate trie nodes
- Always larger than active state due to storage overhead
-
Pruned State (solid orange line): Represents typical validator disk usage over time
- Grows at a moderate rate between active and total state
- This is what most long-running nodes experience without maintenance
- Results from accumulating recent trie nodes that haven't been cleaned up
-
Active State (solid blue line): Grows at a slower, steady rate
- Represents only the current blockchain state needed for validation
- This is your starting point after state sync
-
Total State After Pruning / Resync (dotted red line): Shows state growth after performing maintenance
- Starts fresh from active state level after pruning or resync
- Continues to grow at the same rate as total state
-
Resync/Offline Pruning (vertical grey dotted line): The maintenance operation that reduces disk usage
- Removes accumulated historical data
- Brings total state back down close to active state level
Future Improvement: Firewood
Firewood is an upcoming database upgrade that will address the issue of total state growing too large. This next-generation storage layer is designed to efficiently manage state growth and reduce disk space requirements for node operators.
Managing Disk Usage
Option 1: State Sync (Re-sync)
The simplest way to reclaim disk space is to delete your node's data and re-sync using state sync. Instead of replaying the entire blockchain history to reconstruct the current state, state sync allows nodes to download only the current state directly from network peers. This shortens the bootstrap process from multiple days to just a couple of hours.
State sync is ideal for:
- Validator nodes that don't need full transaction history
- RPC nodes focused on current state queries
- Any node where historical data queries are not required
State sync is available for the C-Chain and Avalanche L1s, but not for P-Chain or X-Chain. Since the bulk of transactions and state growth occur on the C-Chain, state sync still provides significant benefits for bootstrap time and disk usage management.
Configuring State Sync
State sync is enabled by default for the C-Chain. For Avalanche L1s, you can configure it per-chain:
- C-Chain configuration: See C-Chain Config
- Avalanche L1 configuration: See Subnet-EVM Config
# Stop your node first
sudo systemctl stop avalanchego
# Remove the database (adjust path as needed)
rm -rf ~/.avalanchego/db
# Restart - node will state sync automatically
sudo systemctl start avalanchego| Pros | Cons |
|---|---|
| Simple, no configuration needed | Several hours of downtime |
| Guarantees minimal disk usage | Loses any local transaction index |
| Fresh database with no fragmentation | Must re-sync from scratch |
| Fast bootstrap (hours vs days) | Not available for P-Chain or X-Chain |
Zero-Downtime Re-sync for Validators
To avoid validator downtime, you can transfer your validator identity to a fresh node. This works because your validator identity is determined by cryptographic keys in the staking directory, not the database.
How It Works:
Your validator identity consists of three key files in ~/.avalanchego/staking/:
- staker.crt - TLS certificate (determines your Node ID)
- staker.key - TLS private key (for encrypted P2P communication)
- signer.key - BLS signing key (for consensus signatures)
These files define your validator identity. The Node ID shown on the P-Chain is cryptographically derived from staker.crt, so copying these files transfers your complete validator identity.
Step-by-Step Process:
-
Provision a new server with the same or better specs than your current validator
-
Install and configure AvalancheGo on the new server, but don't start it yet:
# Install AvalancheGo on new server # Follow: /docs/nodes/run-a-node/using-install-script/installing-avalanche-go -
Let the new node sync completely (start it normally to download the blockchain):
# On new server sudo systemctl start avalanchego # Monitor sync progress (wait until fully synced) # This may take several hours curl -X POST --data '{ "jsonrpc":"2.0", "id" :1, "method" :"info.isBootstrapped", "params": { "chain":"C" } }' -H 'content-type:application/json;' 127.0.0.1:9650/ext/info -
Stop both nodes simultaneously to prepare for the identity transfer:
# On old validator sudo systemctl stop avalanchego # On new server sudo systemctl stop avalanchego -
Backup the new server's auto-generated keys (optional but recommended):
# On new server mv ~/.avalanchego/staking ~/.avalanchego/staking.backup -
Copy the staking directory from your old validator to the new server:
# From your old validator, copy to new server scp -r ~/.avalanchego/staking/ user@new-server:~/.avalanchego/ # Or use rsync for better control: rsync -avz ~/.avalanchego/staking/ user@new-server:~/.avalanchego/staking/ -
Verify file permissions on the new server:
# On new server chmod 700 ~/.avalanchego/staking chmod 400 ~/.avalanchego/staking/staker.key chmod 400 ~/.avalanchego/staking/staker.crt chmod 400 ~/.avalanchego/staking/signer.key chown -R avalanche:avalanche ~/.avalanchego/staking # If using avalanche user -
Start the new node with your validator identity:
# On new server sudo systemctl start avalanchego -
Verify the Node ID matches:
# On new server - confirm this matches your registered validator Node ID curl -X POST --data '{ "jsonrpc":"2.0", "id" :1, "method" :"info.getNodeID" }' -H 'content-type:application/json;' 127.0.0.1:9650/ext/info -
Monitor for successful validation:
# Check if you're validating curl -X POST --data '{ "jsonrpc":"2.0", "id" :1, "method" :"platform.getCurrentValidators", "params": { "subnetID": null } }' -H 'content-type:application/json;' 127.0.0.1:9650/ext/P
Important Notes:
-
Timing: The entire stop → transfer → start process typically takes 5-15 minutes. Your validator will miss some blocks during this window, but won't be penalized as long as you're back online before your uptime drops below 80%.
-
Don't run both nodes simultaneously: Running two nodes with the same staking keys simultaneously can cause network issues and potential penalties. Always stop the old node before starting the new one.
-
Database not needed: You don't need to copy
~/.avalanchego/db/- the new node already has a fresh, synced database from step 3. -
Config files: If you have custom configuration in
~/.avalanchego/configs/, copy those as well to maintain the same node behavior.
Alternative: Update node in place
If your server supports it, you can also achieve zero downtime by:
- Attaching additional storage to your existing server
- Syncing a new database to the new disk in a separate directory
- Stopping AvalancheGo briefly
- Updating the data directory config to point to the new disk
- Starting AvalancheGo with the fresh database
This avoids transferring staking keys but requires more complex storage management.
Option 2: Offline Pruning
Offline pruning removes old state trie nodes while keeping your node's database intact. This is faster than a full re-sync but requires temporary additional disk space.
| Pros | Cons |
|---|---|
| Faster than full re-sync | Requires ~30-60 minutes downtime |
| Preserves transaction index | Needs temporary disk space for bloom filter |
| No network bandwidth required | Slightly more complex setup |
How Offline Pruning Works
Offline Pruning is ported from go-ethereum to reduce the amount of disk space taken up by the TrieDB (storage for the Merkle Forest).
Offline pruning creates a bloom filter and adds all trie nodes in the active state to the bloom filter to mark the data as protected. This ensures that any part of the active state will not be removed during offline pruning.
After generating the bloom filter, offline pruning iterates over the database and searches for trie nodes that are safe to be removed from disk.
A bloom filter is a probabilistic data structure that reports whether an item is definitely not in a set or possibly in a set. Therefore, for each key we iterate, we check if it is in the bloom filter. If the key is definitely not in the bloom filter, then it is not in the active state and we can safely delete it. If the key is possibly in the set, then we skip over it to ensure we do not delete any active state.
During iteration, the underlying database (LevelDB) writes deletion markers, causing a temporary increase in disk usage.
After iterating over the database and deleting any old trie nodes that it can, offline pruning then runs compaction to minimize the DB size after the potentially large number of delete operations.
Finding the C-Chain Config File
In order to enable offline pruning, you need to update the C-Chain config file to include the parameters offline-pruning-enabled and offline-pruning-data-directory.
The default location of the C-Chain config file is ~/.avalanchego/configs/chains/C/config.json. Please note that by default, this file does not exist. You would need to create it manually. You can update the directory for chain configs by passing in the directory of your choice via the CLI argument: chain-config-dir. See this for more info. For example, if you start your node with:
./build/avalanchego --chain-config-dir=/home/ubuntu/chain-configsThe chain config directory will be updated to /home/ubuntu/chain-configs and the corresponding C-Chain config file will be: /home/ubuntu/chain-configs/C/config.json.
Running Offline Pruning
In order to enable offline pruning, update the C-Chain config file to include the following parameters:
{
"offline-pruning-enabled": true,
"offline-pruning-data-directory": "/home/ubuntu/offline-pruning"
}This will set /home/ubuntu/offline-pruning as the directory to be used by the offline pruner. Offline pruning will store the bloom filter in this location, so you must ensure that the path exists.
Now that the C-Chain config file has been updated, you can start your node with the command (no CLI arguments are necessary if using the default chain config directory):
Once AvalancheGo starts the C-Chain, you can expect to see update logs from the offline pruner:
INFO [02-09|00:20:15.625] Iterating state snapshot accounts=297,231 slots=6,669,708 elapsed=16.001s eta=1m29.03s
INFO [02-09|00:20:23.626] Iterating state snapshot accounts=401,907 slots=10,698,094 elapsed=24.001s eta=1m32.522s
INFO [02-09|00:20:31.626] Iterating state snapshot accounts=606,544 slots=13,891,948 elapsed=32.002s eta=1m10.927s
INFO [02-09|00:20:39.626] Iterating state snapshot accounts=760,948 slots=18,025,523 elapsed=40.002s eta=1m2.603s
INFO [02-09|00:20:47.626] Iterating state snapshot accounts=886,583 slots=21,769,199 elapsed=48.002s eta=1m8.834s
INFO [02-09|00:20:55.626] Iterating state snapshot accounts=1,046,295 slots=26,120,100 elapsed=56.002s eta=57.401s
INFO [02-09|00:21:03.626] Iterating state snapshot accounts=1,229,257 slots=30,241,391 elapsed=1m4.002s eta=47.674s
INFO [02-09|00:21:11.626] Iterating state snapshot accounts=1,344,091 slots=34,128,835 elapsed=1m12.002s eta=45.185s
INFO [02-09|00:21:19.626] Iterating state snapshot accounts=1,538,009 slots=37,791,218 elapsed=1m20.002s eta=34.59s
INFO [02-09|00:21:27.627] Iterating state snapshot accounts=1,729,564 slots=41,694,303 elapsed=1m28.002s eta=25.006s
INFO [02-09|00:21:35.627] Iterating state snapshot accounts=1,847,617 slots=45,646,011 elapsed=1m36.003s eta=20.052s
INFO [02-09|00:21:43.627] Iterating state snapshot accounts=1,950,875 slots=48,832,722 elapsed=1m44.003s eta=9.299s
INFO [02-09|00:21:47.342] Iterated snapshot accounts=1,950,875 slots=49,667,870 elapsed=1m47.718s
INFO [02-09|00:21:47.351] Writing state bloom to disk name=/home/ubuntu/offline-pruning/statebloom.0xd6fca36db4b60b34330377040ef6566f6033ed8464731cbb06dc35c8401fa38e.bf.gz
INFO [02-09|00:23:04.421] State bloom filter committed name=/home/ubuntu/offline-pruning/statebloom.0xd6fca36db4b60b34330377040ef6566f6033ed8464731cbb06dc35c8401fa38e.bf.gzThe bloom filter should be populated and committed to disk after about 5 minutes. At this point, if the node shuts down, it will resume the offline pruning session when it restarts (note: this operation cannot be cancelled).
In order to ensure that users do not mistakenly leave offline pruning enabled for the long term (which could result in an hour of downtime on each restart), we have added a manual protection which requires that after an offline pruning session, the node must be started with offline pruning disabled at least once before it will start with offline pruning enabled again. Therefore, once the bloom filter has been committed to disk, you should update the C-Chain config file to include the following parameters:
{
"offline-pruning-enabled": false,
"offline-pruning-data-directory": "/home/ubuntu/offline-pruning"
}It is important to keep the same data directory in the config file, so that the node knows where to look for the bloom filter on a restart if offline pruning has not finished.
Now if your node restarts, it will be marked as having correctly disabled offline pruning after the run and be allowed to resume normal operation once offline pruning has finished running.
You will see progress logs throughout the offline pruning run which will indicate the session's progress:
INFO [02-09|00:31:51.920] Pruning state data nodes=40,116,759 size=10.08GiB elapsed=8m47.499s eta=12m50.961s
INFO [02-09|00:31:59.921] Pruning state data nodes=41,659,059 size=10.47GiB elapsed=8m55.499s eta=12m13.822s
INFO [02-09|00:32:07.921] Pruning state data nodes=41,687,047 size=10.48GiB elapsed=9m3.499s eta=12m23.915s
INFO [02-09|00:32:15.921] Pruning state data nodes=41,715,823 size=10.48GiB elapsed=9m11.499s eta=12m33.965s
INFO [02-09|00:32:23.921] Pruning state data nodes=41,744,167 size=10.49GiB elapsed=9m19.500s eta=12m44.004s
INFO [02-09|00:32:31.921] Pruning state data nodes=41,772,613 size=10.50GiB elapsed=9m27.500s eta=12m54.01s
INFO [02-09|00:32:39.921] Pruning state data nodes=41,801,267 size=10.50GiB elapsed=9m35.500s eta=13m3.992s
INFO [02-09|00:32:47.922] Pruning state data nodes=41,829,714 size=10.51GiB elapsed=9m43.500s eta=13m13.951s
INFO [02-09|00:32:55.922] Pruning state data nodes=41,858,400 size=10.52GiB elapsed=9m51.501s eta=13m23.885s
INFO [02-09|00:33:03.923] Pruning state data nodes=41,887,131 size=10.53GiB elapsed=9m59.501s eta=13m33.79s
INFO [02-09|00:33:11.923] Pruning state data nodes=41,915,583 size=10.53GiB elapsed=10m7.502s eta=13m43.678s
INFO [02-09|00:33:19.924] Pruning state data nodes=41,943,891 size=10.54GiB elapsed=10m15.502s eta=13m53.551s
INFO [02-09|00:33:27.924] Pruning state data nodes=41,972,281 size=10.55GiB elapsed=10m23.502s eta=14m3.389s
INFO [02-09|00:33:35.924] Pruning state data nodes=42,001,414 size=10.55GiB elapsed=10m31.503s eta=14m13.192s
INFO [02-09|00:33:43.925] Pruning state data nodes=42,029,987 size=10.56GiB elapsed=10m39.504s eta=14m22.976s
INFO [02-09|00:33:51.925] Pruning state data nodes=42,777,042 size=10.75GiB elapsed=10m47.504s eta=14m7.245s
INFO [02-09|00:34:00.950] Pruning state data nodes=42,865,413 size=10.77GiB elapsed=10m56.529s eta=14m15.927s
INFO [02-09|00:34:08.956] Pruning state data nodes=42,918,719 size=10.79GiB elapsed=11m4.534s eta=14m24.453s
INFO [02-09|00:34:22.816] Pruning state data nodes=42,952,925 size=10.79GiB elapsed=11m18.394s eta=14m41.243s
INFO [02-09|00:34:30.818] Pruning state data nodes=42,998,715 size=10.81GiB elapsed=11m26.397s eta=14m49.961s
INFO [02-09|00:34:38.828] Pruning state data nodes=43,046,476 size=10.82GiB elapsed=11m34.407s eta=14m58.572s
INFO [02-09|00:34:46.893] Pruning state data nodes=43,107,656 size=10.83GiB elapsed=11m42.472s eta=15m6.729s
INFO [02-09|00:34:55.038] Pruning state data nodes=43,168,834 size=10.85GiB elapsed=11m50.616s eta=15m14.934s
INFO [02-09|00:35:03.039] Pruning state data nodes=43,446,900 size=10.92GiB elapsed=11m58.618s eta=15m14.705sWhen the node completes, it will emit the following log and resume normal operation:
INFO [02-09|00:42:16.009] Pruning state data nodes=93,649,812 size=23.53GiB elapsed=19m11.588s eta=1m2.658s
INFO [02-09|00:42:24.009] Pruning state data nodes=95,045,956 size=23.89GiB elapsed=19m19.588s eta=45.149s
INFO [02-09|00:42:32.009] Pruning state data nodes=96,429,410 size=24.23GiB elapsed=19m27.588s eta=28.041s
INFO [02-09|00:42:40.009] Pruning state data nodes=97,811,804 size=24.58GiB elapsed=19m35.588s eta=11.204s
INFO [02-09|00:42:45.359] Pruned state data nodes=98,744,430 size=24.82GiB elapsed=19m40.938s
INFO [02-09|00:42:45.360] Compacting database range=0x00-0x10 elapsed="2.157µs"
INFO [02-09|00:43:12.311] Compacting database range=0x10-0x20 elapsed=26.951s
INFO [02-09|00:43:38.763] Compacting database range=0x20-0x30 elapsed=53.402s
INFO [02-09|00:44:04.847] Compacting database range=0x30-0x40 elapsed=1m19.486s
INFO [02-09|00:44:31.194] Compacting database range=0x40-0x50 elapsed=1m45.834s
INFO [02-09|00:45:31.580] Compacting database range=0x50-0x60 elapsed=2m46.220s
INFO [02-09|00:45:58.465] Compacting database range=0x60-0x70 elapsed=3m13.104s
INFO [02-09|00:51:17.593] Compacting database range=0x70-0x80 elapsed=8m32.233s
INFO [02-09|00:56:19.679] Compacting database range=0x80-0x90 elapsed=13m34.319s
INFO [02-09|00:56:46.011] Compacting database range=0x90-0xa0 elapsed=14m0.651s
INFO [02-09|00:57:12.370] Compacting database range=0xa0-0xb0 elapsed=14m27.010s
INFO [02-09|00:57:38.600] Compacting database range=0xb0-0xc0 elapsed=14m53.239s
INFO [02-09|00:58:06.311] Compacting database range=0xc0-0xd0 elapsed=15m20.951s
INFO [02-09|00:58:35.484] Compacting database range=0xd0-0xe0 elapsed=15m50.123s
INFO [02-09|00:59:05.449] Compacting database range=0xe0-0xf0 elapsed=16m20.089s
INFO [02-09|00:59:34.365] Compacting database range=0xf0- elapsed=16m49.005s
INFO [02-09|00:59:34.367] Database compaction finished elapsed=16m49.006s
INFO [02-09|00:59:34.367] State pruning successful pruned=24.82GiB elapsed=39m34.749s
INFO [02-09|00:59:34.367] Completed offline pruning. Re-initializing blockchain.
INFO [02-09|00:59:34.387] Loaded most recent local header number=10,671,401 hash=b52d0a..7bd166 age=40m29s
INFO [02-09|00:59:34.387] Loaded most recent local full block number=10,671,401 hash=b52d0a..7bd166 age=40m29s
INFO [02-09|00:59:34.387] Initializing snapshots async=true
DEBUG[02-09|00:59:34.390] Reinjecting stale transactions count=0
INFO [02-09|00:59:34.395] Transaction pool price threshold updated price=470,000,000,000
INFO [02-09|00:59:34.396] Transaction pool price threshold updated price=225,000,000,000
INFO [02-09|00:59:34.396] Transaction pool price threshold updated price=0
INFO [02-09|00:59:34.396] lastAccepted = 0xb52d0a1302e4055b487c3a0243106b5e13a915c6e178da9f8491cebf017bd166
INFO [02-09|00:59:34] <C Chain> snow/engine/snowman/transitive.go#67: initializing consensus engine
INFO [02-09|00:59:34] <C Chain> snow/engine/snowman/bootstrap/bootstrapper.go#220: Starting bootstrap...At this point, the node will go into bootstrapping and (once bootstrapping completes) resume consensus and operate as normal.
Disk Space Considerations for Offline Pruning
To ensure the node does not enter an inconsistent state, the bloom filter used for pruning is persisted to offline-pruning-data-directory for the duration of the operation. This directory should have offline-pruning-bloom-filter-size available in disk space (default 512 MB).
The underlying database (LevelDB) uses deletion markers (tombstones) to identify newly deleted keys. These markers are temporarily persisted to disk until they are removed during a process known as compaction. This will lead to an increase in disk usage during pruning. If your node runs out of disk space during pruning, you may safely restart the pruning operation. This may succeed as restarting the node triggers compaction.
If restarting the pruning operation does not succeed, additional disk space should be provisioned.
Choosing the Right Approach
| Scenario | Recommended Approach |
|---|---|
| Disk nearly full, need space fast | State sync (re-sync) |
| Regular maintenance, have spare disk space | Offline pruning |
| Running a block explorer or indexer | Keep archive state, add more storage |
| New validator setup | State sync (required) |
Monitoring Disk Usage
Track your node's disk usage over time to plan maintenance:
# Check database size
du -sh ~/.avalanchego/db
# Check available disk space
df -h /Consider setting up alerts when disk usage exceeds 80% to give yourself time to plan maintenance.
P-Chain and X-Chain State
The P-Chain and X-Chain have significantly smaller state footprints compared to the C-Chain:
- P-Chain: Stores validator metadata, Avalanche L1 definitions, and staking transactions. State size is typically < 10 GB and grows very slowly.
- X-Chain: Handles AVAX transfers using the UTXO model. State size is typically < 50 GB and grows slowly.
Important limitations:
- State sync is not available for P-Chain or X-Chain
- These chains always sync from genesis by replaying all transactions
- Bootstrap time is faster than C-Chain despite no state sync due to much smaller state size (typically < 1 hour)
- Disk space management is rarely needed for these chains
L1-Specific Considerations
For Avalanche L1s running Subnet-EVM:
- State size scales with usage: High-throughput chains accumulate state faster
- Same pruning tools apply: Offline pruning works identically to C-Chain
- State sync available: Configure via Subnet-EVM chain config
- Plan storage accordingly: Reference the system requirements for your throughput tier
Is this guide helpful?