Periodic State Sync
Instructions for performing a periodic state sync.
By bootstrapping a new node via state sync and transfering your validator identity you can reduce disk usage with zero downtime.
| Pros | Cons |
|---|---|
| No downtime for validator | Needs separate machine to bootstrap |
| Fresh, clean database | Network bandwidth for sync |
| No bloom filter disk overhead | More complex multi-step process |
If you don't have access to a separate machine, you can also do a state sync snapshot deletion instead.
How It Works
This works because your validator identity is determined by cryptographic keys in the staking directory, not the database.
Your validator identity consists of three key files in ~/.avalanchego/staking/:
- staker.crt - TLS certificate (determines your Node ID)
- staker.key - TLS private key (for encrypted P2P communication)
- signer.key - BLS signing key (for consensus signatures)
These files define your validator identity. The Node ID shown on the P-Chain is cryptographically derived from staker.crt, so copying these files transfers your complete validator identity.

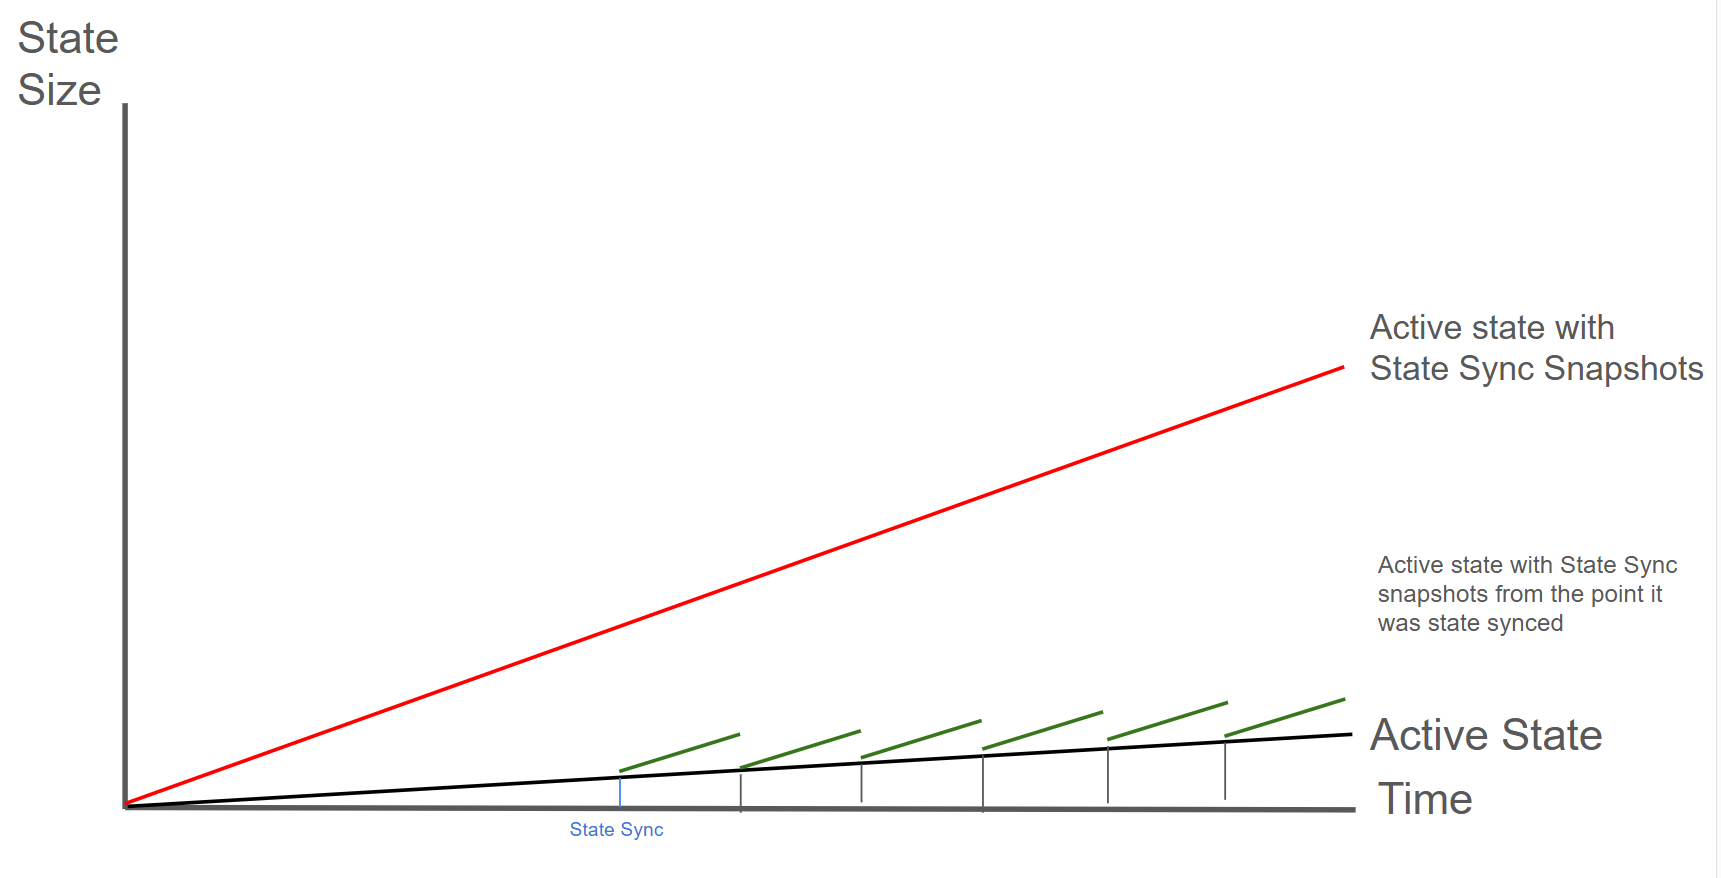
The diagram shows the process: stop the old node, let a new node state sync, then transfer the staking keys to continue validating with a fresh database.
Step-by-Step Process
Save the Node ID of the old validator
To verify that the Node ID of the old validator matches the Node ID of the new validator note down the node ID of the old validator:
# On old validator
curl -X POST --data '{
   "jsonrpc":"2.0",
   "id"     :1,
   "method" :"info.getNodeID"
}' -H 'content-type:application/json;' 127.0.0.1:9650/ext/info
Provision a new server with the same or better specs than your current validator
Don't copy the database at ~/.avalanchego/db/. The new node sync a smaller fresh, synced database
from the other nodes.
Install and configure AvalancheGo
Follow the instructions to set up a new node. If you have custom configuration in
~/.avalanchego/configs/, copy those as well to maintain the same node behavior. Make sure that you
are not manually deactivating state sync in that config file.
Start and monitor the node state sync
Start the node according to the instructions. State sync is enabled by default in the node
configuration. You can monitor the sync progress by checking the info.isBootstrapped RPC endpoint:
# Monitor sync progress (wait until fully synced)
# This may take several hours
curl -X POST --data '{
   "jsonrpc":"2.0",
   "id"     :1,
   "method" :"info.isBootstrapped",
   "params": {
      "chain":"C"
   }
}' -H 'content-type:application/json;' 127.0.0.1:9650/ext/info
Stop both nodes
Once the state sync has completed, stop both nodes to prepare for the identity transfer. The entire stop → transfer → restart process typically takes 5-15 minutes. Your validator will miss some blocks during this window, but won't be penalized as long as you're back online before your uptime drops below 80%.
Backup the new server's auto-generated keys
Backup the new server's auto-generated keys (optional but recommended):
# On new server
mv ~/.avalanchego/staking ~/.avalanchego/staking.backup
Transfer the staking keys
Copy the staking directory from your old validator to the new server
# From your old validator, copy to new server
scp -r ~/.avalanchego/staking/ user@new-server:~/.avalanchego/

# Or use rsync for better control:
rsync -avz ~/.avalanchego/staking/ user@new-server:~/.avalanchego/staking/
Verify file permissions on the new server
# On new server
chmod 700 ~/.avalanchego/staking
chmod 400 ~/.avalanchego/staking/staker.key
chmod 400 ~/.avalanchego/staking/staker.crt
chmod 400 ~/.avalanchego/staking/signer.key
chown -R avalanche:avalanche ~/.avalanchego/staking  # If using avalanche user
Start the new node with your validator identity
Don't run both nodes simultaneously: Running two nodes with the same staking keys simultaneously can cause network issues and potential penalties. Always stop the old node before starting the new one.
Verify the Node ID matches
# On new server - confirm this matches your registered validator Node ID
curl -X POST --data '{
  "jsonrpc":"2.0",
  "id"     :1,
  "method" :"info.getNodeID"
}' -H 'content-type:application/json;' 127.0.0.1:9650/ext/info
Monitor for successful validation
# Check if you're validating
curl -X POST --data '{
  "jsonrpc":"2.0",
  "id"     :1,
  "method" :"platform.getCurrentValidators",
  "params": {
    "subnetID": null
  }
}' -H 'content-type:application/json;' 127.0.0.1:9650/ext/P
Is this guide helpful?