Setting Up Your x402 Development Environment
Configure your development environment and set up the x402 starter kit with Thirdweb facilitator.
Introduction
In this lesson, you'll set up everything needed to start building with x402. We'll walk through cloning the starter kit, configuring credentials, and running your first local x402-enabled application on Avalanche Fuji testnet.
Prerequisites
Ensure you have the following installed:
-
Node.js 18+: Download from nodejs.org
node --version # Should show v18.0.0 or higher -
Git: Download from git-scm.com
-
Code Editor: VS Code recommended
-
Wallet: Core Wallet recommended for Avalanche
Step 1: Clone the x402 Starter Kit
Start by downloading the starter kit repository:
# Clone the repository
git clone https://github.com/ava-labs/x402-starter-kit.git

# Navigate into the directory
cd x402-starter-kit
Step 2: Install Dependencies
Install all required packages:
npm installThis installs Next.js 16, Thirdweb SDK v5, x402-next middleware, Tailwind CSS, and TypeScript.
Step 3: Create Environment File
Create your environment configuration file:
# Copy the example file
cp .env.example .env.local
Now open .env.local in your code editor. You'll fill in the values as we create accounts and wallets in the next steps.
The file should look like this:
# Thirdweb API credentials (you'll add these in Step 4)
THIRDWEB_CLIENT_ID=
THIRDWEB_SECRET_KEY=

# ERC4337 Smart Account address (you'll add this in Step 4)
THIRDWEB_SERVER_WALLET_ADDRESS=

# Your wallet address that receives payments (you'll add this in Step 5)
MERCHANT_WALLET_ADDRESS=

# OpenRouter API key for AI chat features (you'll add this in Step 5)
OPENROUTER_API_KEY=
Step 4: Create Thirdweb Account and Get Credentials
Thirdweb provides the facilitator service that handles payment verification and settlement.
4.1 Sign Up and Create Project
- Visit thirdweb.com/dashboard
- Create an account using email, Google, GitHub, or Wallet
- Click "Create Project"
- Name your project (e.g., "x402 Payment Demo")
- Allow all domains (or at least
localhost:3000) - Click "Create"
4.2 Get API Credentials
After creating your project:
- Copy your Client ID
- Copy and save the "Secret Key"
Immediately paste these into your .env.local file:
THIRDWEB_CLIENT_ID=your_client_id_here
THIRDWEB_SECRET_KEY=your_secret_key_here
Security Note: Never commit your Secret Key to version control (the .gitignore already excludes .env.local).
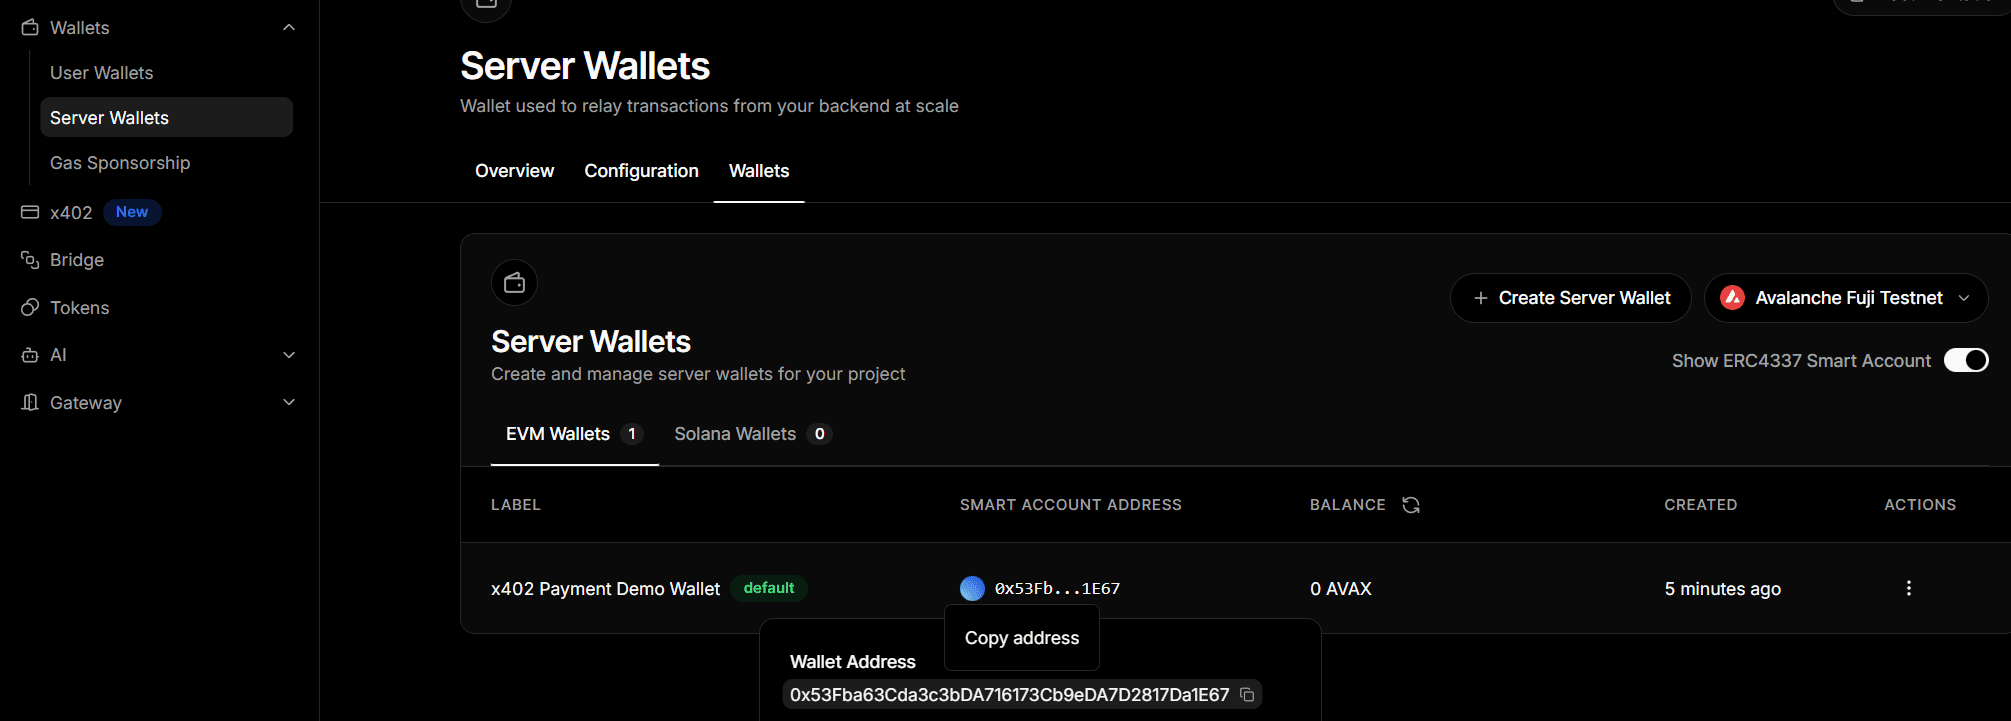
4.3 Create ERC4337 Smart Account
The Thirdweb facilitator requires an ERC4337 Smart Account (not a regular EOA wallet). This Smart Account will submit transactions on-chain and sponsor gas fees on behalf of users, enabling gasless payments.
- In your Thirdweb dashboard, navigate to Wallets → Server Wallets → Wallets
- Click the toggle "Show ERC4337 Smart Account"
- Choose "Avalanche Fuji Testnet" as the network
- Copy the wallet address
Immediately paste this into your .env.local file:
THIRDWEB_SERVER_WALLET_ADDRESS=...Step 5: Configure Your Wallet
Core Wallet comes with Avalanche Fuji pre-configured:
- Open Core Wallet
- Turn on Testnet Mode in Settings → Advanced
Alternatively, add Fuji manually to any other wallet:
- Network Name: Avalanche Fuji C-Chain
- RPC URL:
https://api.avax-test.network/ext/bc/C/rpc - Chain ID:
43113 - Symbol:
AVAX - Explorer:
https://testnet.snowtrace.io/
Step 6: Setup Merchant Wallet Address
Copy and paste your wallet address (this wallet will receive USDC payments from customers) into your .env.local file:
MERCHANT_WALLET_ADDRESS=0xMerchantWalletAddressHereStep 7: Get OpenRouter API Key (Optional)
OpenRouter provides access to AI models for the token-based AI chat feature. This step is optional if you only want to use the basic payment features.
- Visit OpenRouter
- Create an account or sign in
- Go to API Keys
- Click "Create Key" and copy your API key
Add to your .env.local file:
OPENROUTER_API_KEY=sk-or-...Step 8: Get Test USDC
Get test USDC for making test payments:
- Visit Circle's USDC Faucet
- Select "Avalanche Fuji" network
- Enter your wallet address
- Request tokens
Fuji USDC Contract: 0x5425890298aed601595a70AB815c96711a31Bc65
You don't need test AVAX because the facilitator will pay the gas fee.
Step 9: Verify Your Configuration
Your .env.local file should now be completely filled in:
# Thirdweb API credentials
THIRDWEB_CLIENT_ID=abc123...
THIRDWEB_SECRET_KEY=sk_live_...

# ERC4337 Smart Account address (facilitator wallet)
THIRDWEB_SERVER_WALLET_ADDRESS=0x1234...

# A wallet address (receives payments)
MERCHANT_WALLET_ADDRESS=0x5678...

# OpenRouter API key (optional, for AI chat features)
OPENROUTER_API_KEY=sk-or-...
Step 10: Run the Development Server
Start the application:
npm run devStep 11: Verify Your Setup
Open your browser and navigate to http://localhost:3000.
You should see the x402 Starter Kit interface with:
- Header with "x402 Starter Kit"
- Mode switcher at the top: "Human Payment" and "AI Agent" modes
- Two payment tiers in Human Payment mode: Basic ($0.01) and Premium ($0.15)
- "Connect Wallet" button
- Transaction log section
If you see this interface, your environment is correctly configured!
The starter kit supports two main modes:
- Human Payment Mode: Manual payment for content tiers (covered in the next lesson)
- AI Agent Mode: Autonomous payments for AI services (covered in later lessons)
Additional Resources
- Thirdweb Documentation
- x402 Starter Kit Repository
- ERC4337 Standard
- OpenRouter API (for AI chat features)
Is this guide helpful?